
Using this reference
Use this alongside the Camera Raw walkthrough. Start at Fit to judge the whole photograph, then use 100% to judge texture and detail. Change one control at a time and press P outside an input field to compare with the original.
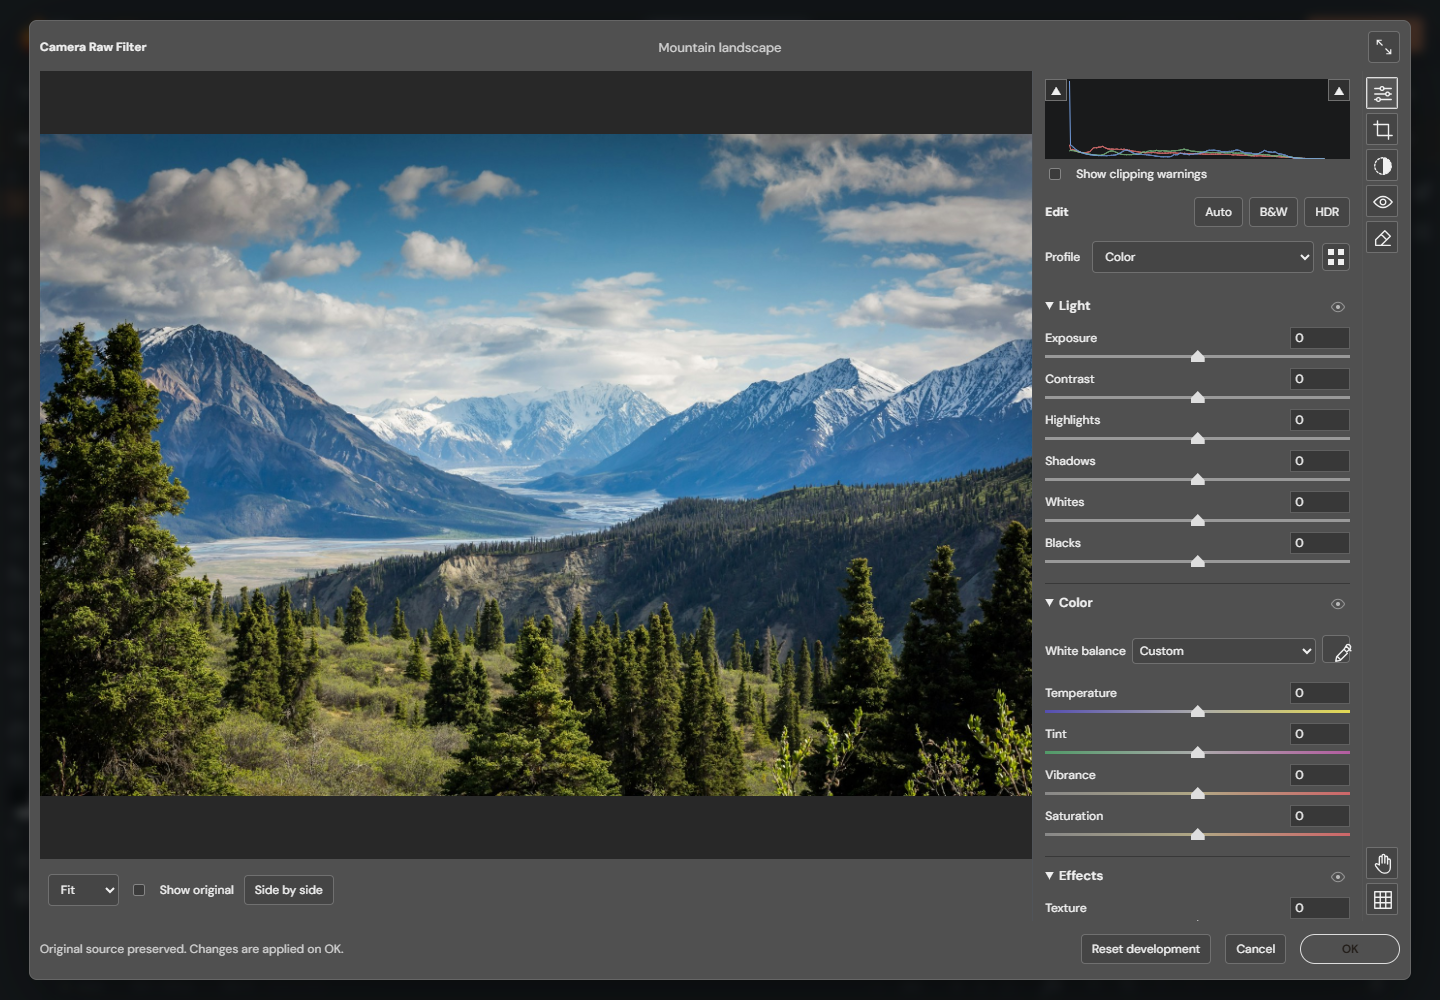
Light
| Control | What it changes | A useful starting situation |
|---|---|---|
| Exposure | Overall brightness, measured in stops. Positive values brighten; negative values darken. | Your subject is too dark or the whole photo is too bright. |
| Contrast | Separation between darker and lighter tones. | A photo looks flat. Increase gently; strong contrast can hide detail. |
| Highlights | Brighter parts of the photograph. | Reduce it to bring out detail already present in bright clouds. |
| Shadows | Darker parts of the photograph. | Raise it to make a shaded face or foreground easier to see. |
| Whites | The bright end of the tonal range. | Adjust the brightest tones after setting Exposure and Highlights. |
| Blacks | The dark end of the tonal range. | Refine the deepest tones after adjusting Shadows. |
For a bright sky and dark foreground, set Exposure for the subject first. Reduce Highlights, then raise Shadows gently. Refine Whites and Blacks last. Raising every brightness control together often makes the photo look washed out. Lowering Highlights cannot reconstruct detail that was never recorded.
The histogram places dark tones on the left and bright tones on the right. A tall peak is not automatically a problem: a large plain wall can produce one. Use the shadow and highlight warning buttons independently to inspect clipped pixels. Blue marks shadows; red marks highlights. These warnings describe the filtered samples, not a guarantee that every display or export can reproduce them.
Color
| Control | What it changes | How to use it |
|---|---|---|
| White balance | The starting color balance. | Try Auto, or sample a neutral gray/white object with visible detail. Avoid colored objects and bright reflections. |
| Temperature | Relative blue/yellow warmth. | Move warmer for an unwanted blue cast; cooler for an unwanted yellow cast. These values are not Kelvin. |
| Tint | Relative green/magenta balance. | Correct a green or magenta cast after Temperature. |
| Vibrance | Color intensity with more emphasis on subdued colors. | Try small increases before increasing Saturation. |
| Saturation | Overall color intensity. | Reduce for a quieter result; increase carefully to avoid unnatural colors. |
Auto white balance is an estimate. A photograph dominated by sunset orange, green foliage or blue water may need manual correction. A neutral reference in the same light as the subject is more useful than an arbitrary white object elsewhere in the scene.
B&W switches to monochrome without discarding the other settings. Color and Monochrome profiles are available; an imported creative CUBE look is separate from camera calibration. Adobe camera profiles and DCP/XMP camera-profile import are not provided.
Effects
| Control | What it changes | Watch for |
|---|---|---|
| Texture | Fine surface detail. | Excessive detail in skin or noisy areas. Judge at 100%. |
| Clarity | Local contrast around visible structures. | Bright/dark halos and an overly harsh appearance. |
| Dehaze | Haze-like contrast and color. | Strong color shifts or very dark shadows at high amounts. |
| Vignette | Brightness near the image edges. Negative darkens; positive lightens. | Obvious corners that distract from the subject. |
| Grain | An added texture effect. | Grain is not noise removal and does not recover detail. |
Expand Vignette after choosing a nonzero amount. Midpoint changes how far inward the effect reaches, Roundness changes its shape, and Feather softens its transition. Expand Grain after raising its amount: Size changes texture scale and Roughness changes its irregularity.
Curve and selective color
Curve maps an input brightness to an output brightness. A diagonal point curve leaves that channel unchanged. Raising a point brightens the tones around it; lowering it darkens them. Start with the RGB channel. Individual Red, Green and Blue curves can also introduce or remove a color cast.
Use Parametric for broad Shadows, Darks, Lights and Highlights changes. Its three dividers control where those ranges meet. Use Point curve when you need individual anchors and exact Input/Output values. Both adjustments combine; switching the displayed mode does not disable the other one. Reset curve resets only the displayed point-curve channel.
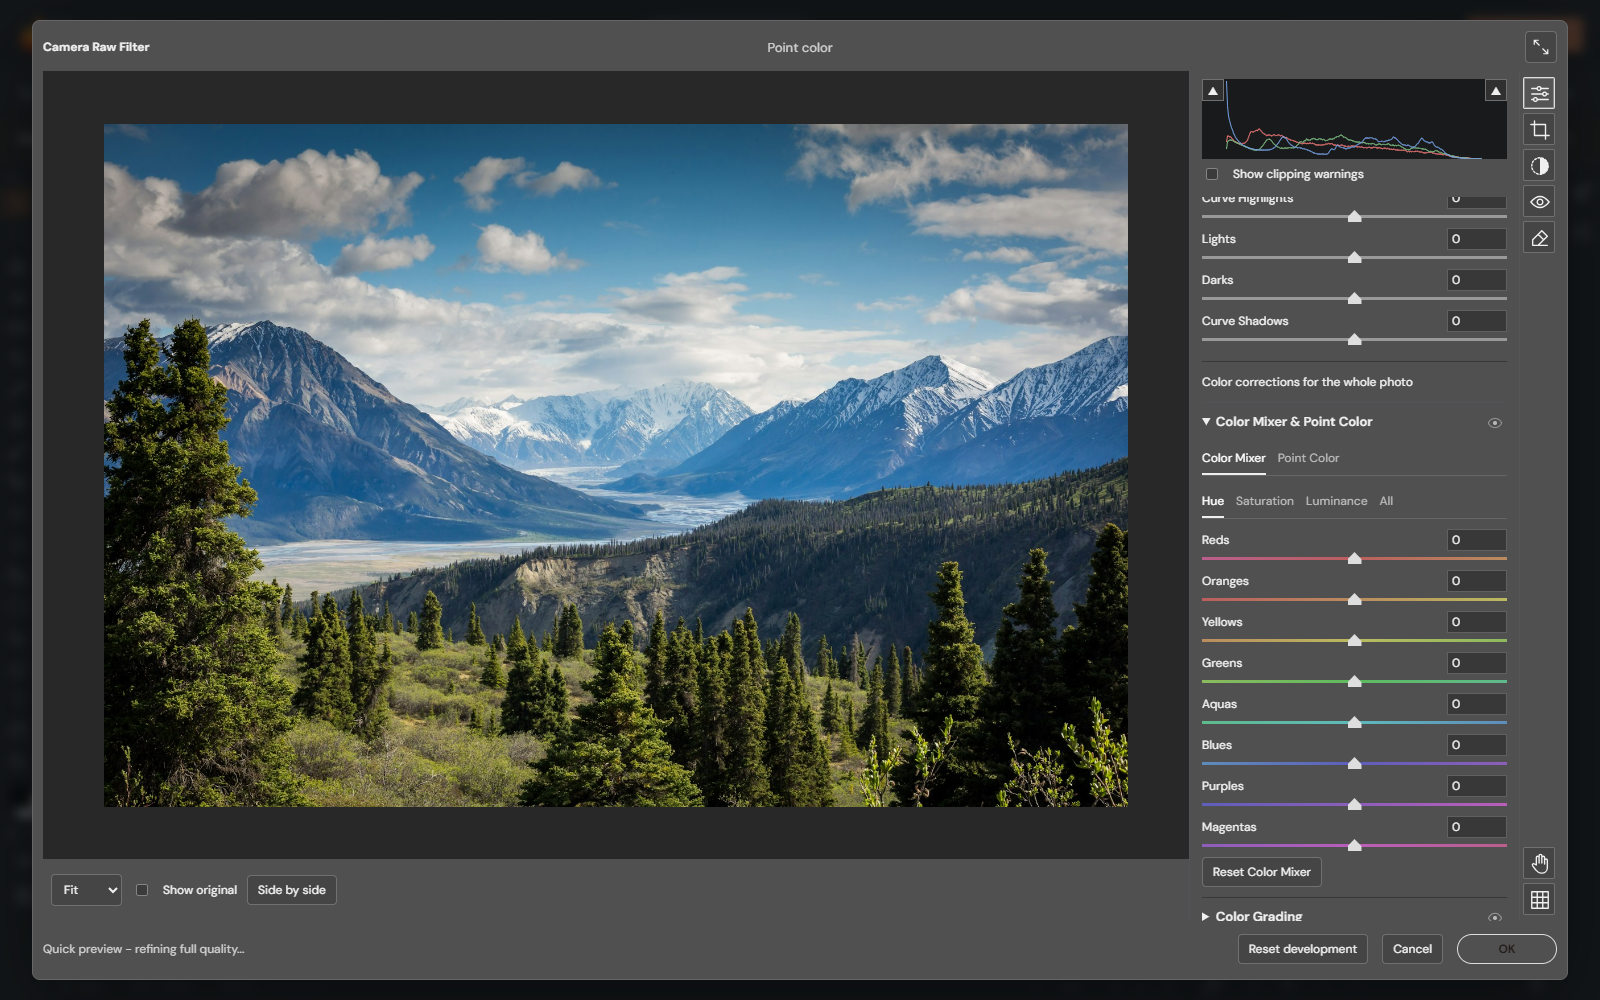
Color Mixer targets Reds, Oranges, Yellows, Greens, Aquas, Blues, Purples and Magentas. Hue changes a color's character, Saturation changes its intensity, and Luminance changes its brightness. For example, lower Blue luminance slightly to darken a blue sky. Check other blue objects too: a global color range is not an object selection.
Point Color samples a narrower color target. Use it when a broad mixer range affects too much. For a correction limited to one part of the photograph, use a local mask as well. See the targeted color guide for range controls.
Color Grading adds color by tonal range rather than by object color. In the three-way view, use Shadows, Midtones and Highlights separately. Drag around a wheel to choose hue and outward to increase saturation. Press Escape during a drag to restore the starting color. You can also focus a wheel with Tab: Left/Right changes hue, Up/Down changes saturation, Shift uses larger steps, and Home resets hue and saturation. Luminance adjusts that range's brightness. Global affects the whole image; Balance shifts the tonal weighting and Blending controls overlap. Start with low saturation, then compare with the panel eye button.
Detail
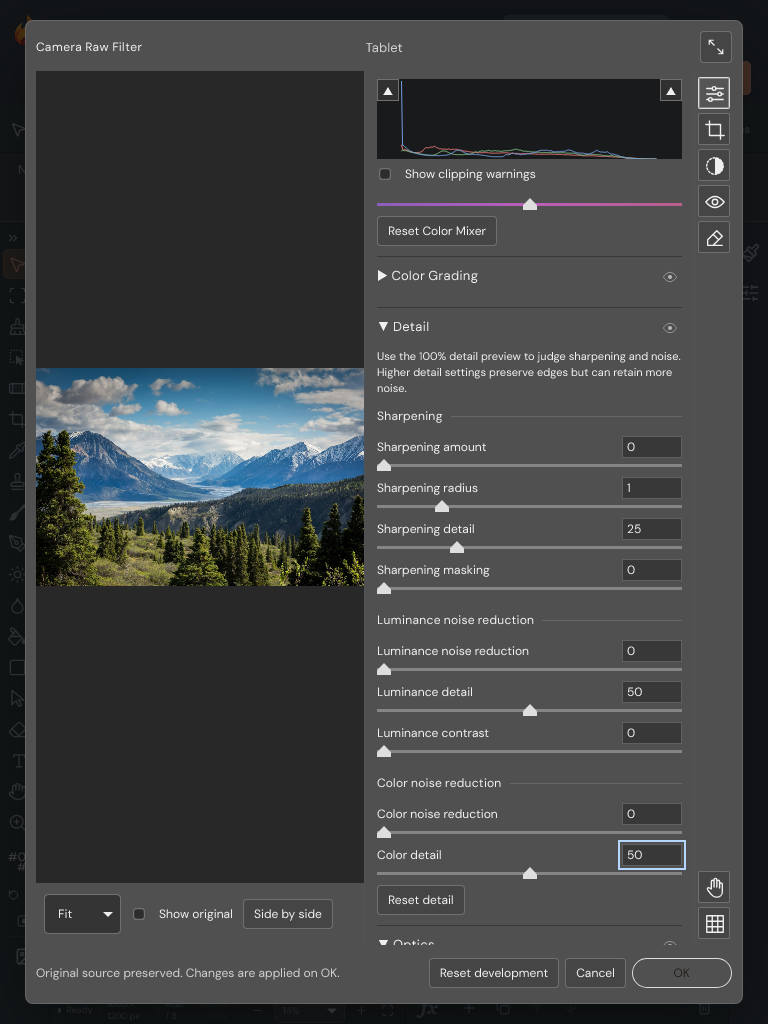
Inspect a textured area and a smooth area at 100% before judging these controls. A small Fit preview can conceal noise and sharpening halos.
| Control | Purpose |
|---|---|
| Sharpening amount | Strength of edge enhancement. Increase gradually. |
| Sharpening radius | Width of the enhancement around edges. Larger values can create wider halos. |
| Sharpening detail | Emphasis on finer detail; high values can retain or emphasize noise. |
| Sharpening masking | Restricts sharpening away from smoother areas. |
| Luminance noise reduction | Smooths brightness noise. High values can also smooth real texture. |
| Luminance detail | Balances detail retention against smoothing. |
| Luminance contrast | Retains contrast during luminance smoothing. |
| Color noise reduction | Reduces colored speckles. |
| Color detail | Balances color-edge retention against color smoothing. |
Try noise reduction first, then reassess sharpening. Reset detail restores the whole Detail group; double-clicking one slider resets only that control. Sharpening cannot fully repair an out-of-focus photograph.
Optics and framing
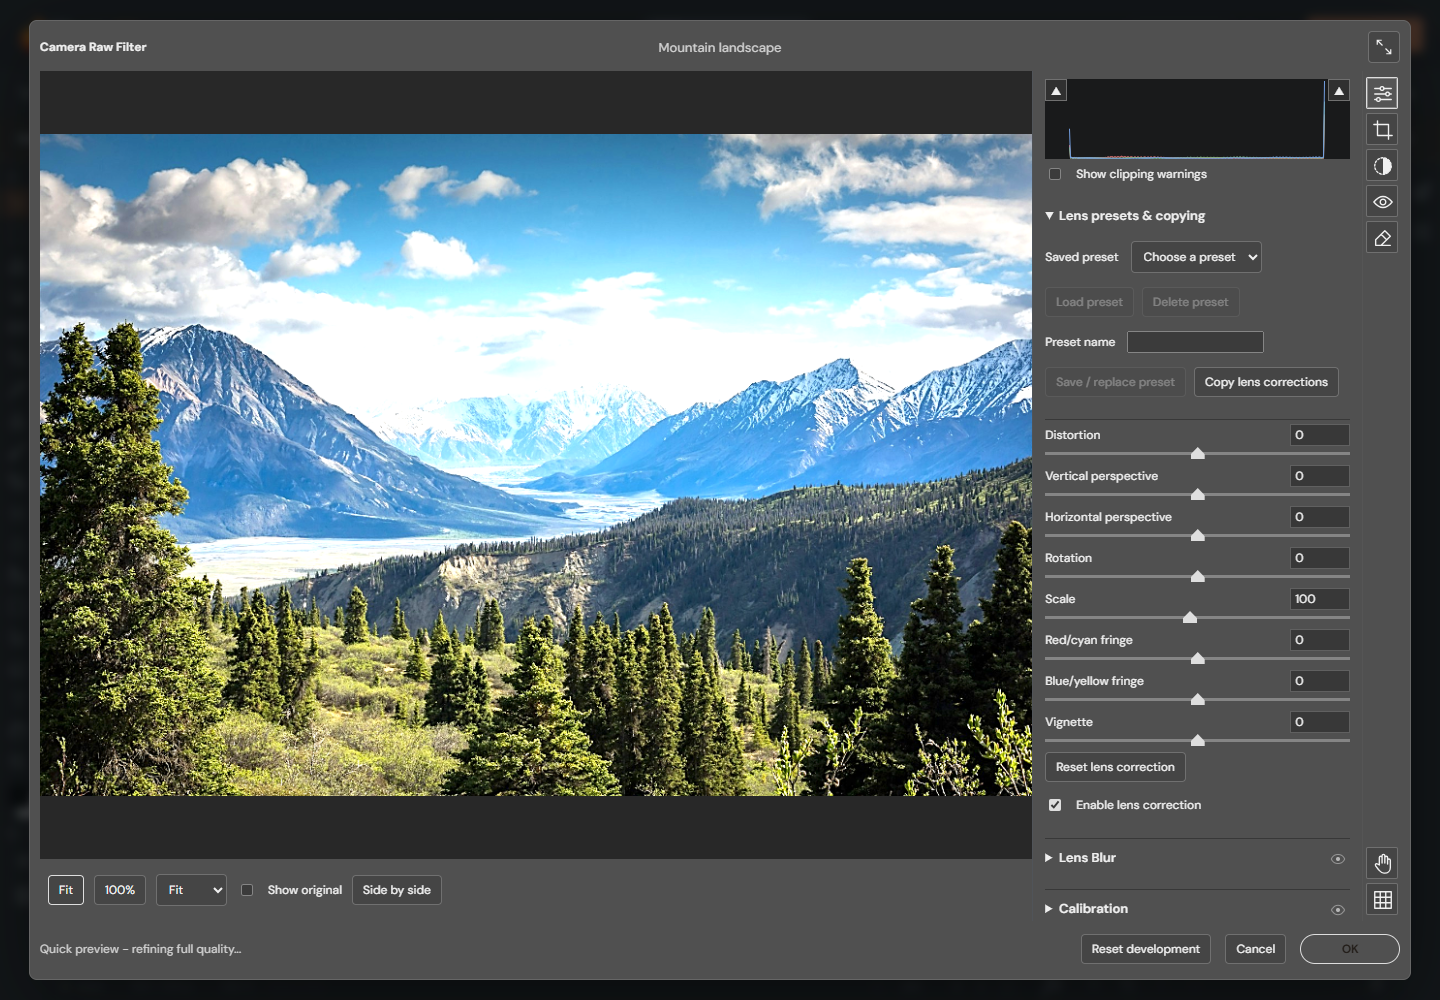
| Control | Purpose |
|---|---|
| Distortion | Corrects curved-looking lines caused by lens distortion. |
| Vertical perspective | Adjusts vertical convergence, such as buildings leaning inward. |
| Horizontal perspective | Adjusts convergence across the image. |
| Rotation | Levels a tilted horizon. Enable the alignment grid as a reference. |
| Scale | Changes the image scale; 100 is the default. |
| Red/cyan fringe | Adjusts red/cyan edge misalignment. Inspect at 100%. |
| Blue/yellow fringe | Adjusts blue/yellow edge misalignment. Inspect at 100%. |
| Vignette | Adjusts edge brightness within lens correction. This is separate from Effects → Vignette. |
Geometry correction can expose transparent edges. Inspect the full image afterward and use Crop if needed. A pending development crop changes the document framing, including other layers; it is not merely a preview zoom. Cancel discards that pending crop along with the workspace changes.
Lens Blur and Calibration
Enable Apply in Lens Blur before adjusting Blur Amount. Choose Circle, Bubble, 5-blade, Ring or Anamorphic in Bokeh. Bubble emphasizes the rim; Ring uses a hollow aperture; Anamorphic produces an oval blur. Choose Custom iris to adjust Iris Blades and Blade Curvature; changing either also returns to Custom iris. Rotation rotates the polygonal or Anamorphic iris; it is disabled for rotationally symmetric Circle, Bubble and Ring shapes. Cat Eye progressively clips the aperture toward the image edges for a crescent-shaped blur; zero disables it. Bokeh Boost emphasizes blurred highlights; Highlight Threshold chooses which bright areas contribute.
Without a depth map, the blur is uniform. Load an aligned grayscale depth map to vary blur by depth: black means near and white means far, with Invert depth available to reverse that convention. Near Focus and Far Focus define the interval to keep sharp. This workflow uses a supplied map, not automatic depth estimation. See focus range instructions.
Calibration contains Shadow Tint and Hue/Saturation for each RGB primary. These affect color relationships broadly, so use small changes and compare the whole photograph. They are PhotoBlaze adjustments, not a camera-specific Adobe profile or a substitute for correct white balance.
Comparing and correcting an edit
- Double-click a slider to restore that control's default. Other adjustments stay in place.
- Drag a numeric field's label horizontally to adjust its value. Light, Color, Effects (including expanded Vignette and Grain), Color Grading, Calibration, Detail and profile Amount preview the adjustment while dragging. Release to keep it, or press Escape during the drag to restore the previous settings.
- Press U to toggle shadow clipping warnings and O to toggle highlight warnings, outside input fields. Both can be enabled together.
- Hold a panel's eye button to compare without that panel. Release it to restore the adjustment.
- Use side-by-side comparison for the overall result. Pressing P switches to the original view and leaves side-by-side mode.
- Control+0 selects Fit; Control+Alt+0 selects 100%. The application also handles the corresponding Command shortcuts.
- Cancel discards the pending workspace edit. OK applies it. Save an editable PhotoBlaze PSD to retain PhotoBlaze development settings; this does not create a native Adobe Camera Raw Smart Filter.
For curves, selective colors, masks, retouching, optics, depth maps and export limitations, continue with the remaining adjustment panels.